
Mutatis
My First Minikernel!

Hey, this is William, with an update on my game Mutatis for the Atari 2600. I made some progress on this game, during this summer. This is the game I entered in the Atari I, Rebel Game Jam a few months ago.

They sent me this t-shirt.
I started using more standard software versioning with this update instead of my previous methodology.
I learned they call this naming convention semantic versioning. Three numbers designate Major, Minor, and Patch alterations.
So I’m calling this version of the game 1.1.1 and the Game Jam version 1.0.0.
******************************

Title Screen // Game Select // Level Select
I worked a bit on a title screen, but think I’ll forgo showing a title? I mean, the text. Also working a bit on a game select screen.
In my case there will probably be four games, with slight variations to the gameplay, so I can make a cool game select matrix for the manual.

For the game select screen I played around with, the player selects which game to play using the white dot seen above. The gray and blue bar beneath display the 2600’s difficulty switches. This isn’t integrated in the game though, still working on the design separately.
If you remember those og Atari boxes, they claimed “includes a thousand games” or whatever, actually referring to alterations of the same game. I think it’d be fun to continue that tradition.

Also designed this level indicator, meant to be seen as an interstitial between the levels. Still thinking on this concept. Haven't decided if you pick a level or it just moves automatically to the next level, to show your progress, as you’re trying to get Mutatis out of the experimental facility.
******************************
Sound
I removed most of the sounds from the game temporarily, sound will be a separate challenge that I’ve decided to tackle last. I’ve also removed the mutations for the moment, so the player only has one form, as I work on the rest of the game.
******************************

Playfield
I added some detail to the gameplay arena, by using the top and bottom of the player0 sprite. Mutatis is in the middle of the player0 sprite, and the animated containment machine above and below, that’s also the player0 sprite, animated during the same three frames.
******************************

Enemy Sprites
I added explosions for when the player destroys an enemy with the Eye of Mutatis, or an enemy runs into Mutatis. On impact the player1 sprite is redefined as the explosion.


I also started adding new enemy types. This one, provisionally called the Speedster, appears on screen and makes a direct assault on Mutatis. It does not steal shield node pieces, unlike the Grabber, which is the only enemy type that does that. You can block the Speedster with the shields, and it’ll explode. But you cannot destroy it with the Eye, unlike other types.
Currently the Speedster appears at regular intervals during each level. I’m using a one minute timer loop, and then everything repeats, which on my machine is roughly seventy ticks of the variable, one for each game loop. When I have all the enemy types integrated, certain types will only appear on certain levels. And I’ll rethink the duration if the loop, as I optimize gameplay.
I haven’t tweaked flight patterns or behavior of the Grabber yet, or the Genetic Neutralizer, which steals your biota.
******************************

Biota Mechanic
The biggest change in this version is the inclusion of the biota mechanic. When the above enemy type appears, which I don’t really have a name for yet, but I’ll call it the Biota Bug for now, they carry the biota that Mutatis must acquire to mutate. Collect four and the level changes (but the mutations are not in the game yet).
To be honest, I’m not even sure which end of this sprite is the front. Either it carries the biota at its back, or the biota is in fact its head.

I tried a few different variations of this bug before choosing the final sprite. I make my sprites in Pixquare.
******************************
Biota Bug Flight Path
Since I started working on the flight pattern of the bug before settling on the design, in the below examples you’ll just see the biota sprite.


For its erratic bug-like movement I first tried some time-based code to suggest a nervous fly-like motion, so it moves in increasingly larger arcs before retreating. I liked some of that motion, but when the code started looking nasty and taking up so much space I thought this would be a good opportunity to try data arrays again.
If you’ve seen my past videos about Telemachus, my adventure game for the 2600, in that game I had successfully used a data array to determine where a teleporting space mine would appear and disappear. But later trying to use an array again, it failed to be called, and I couldn’t determine what had changed.
Well, I had started using bankswitching between those two attempts. The documentation I was using didn’t mention you need to put the array in the same bank where the data is called. Recently I found this answer on the Atari Age forums.
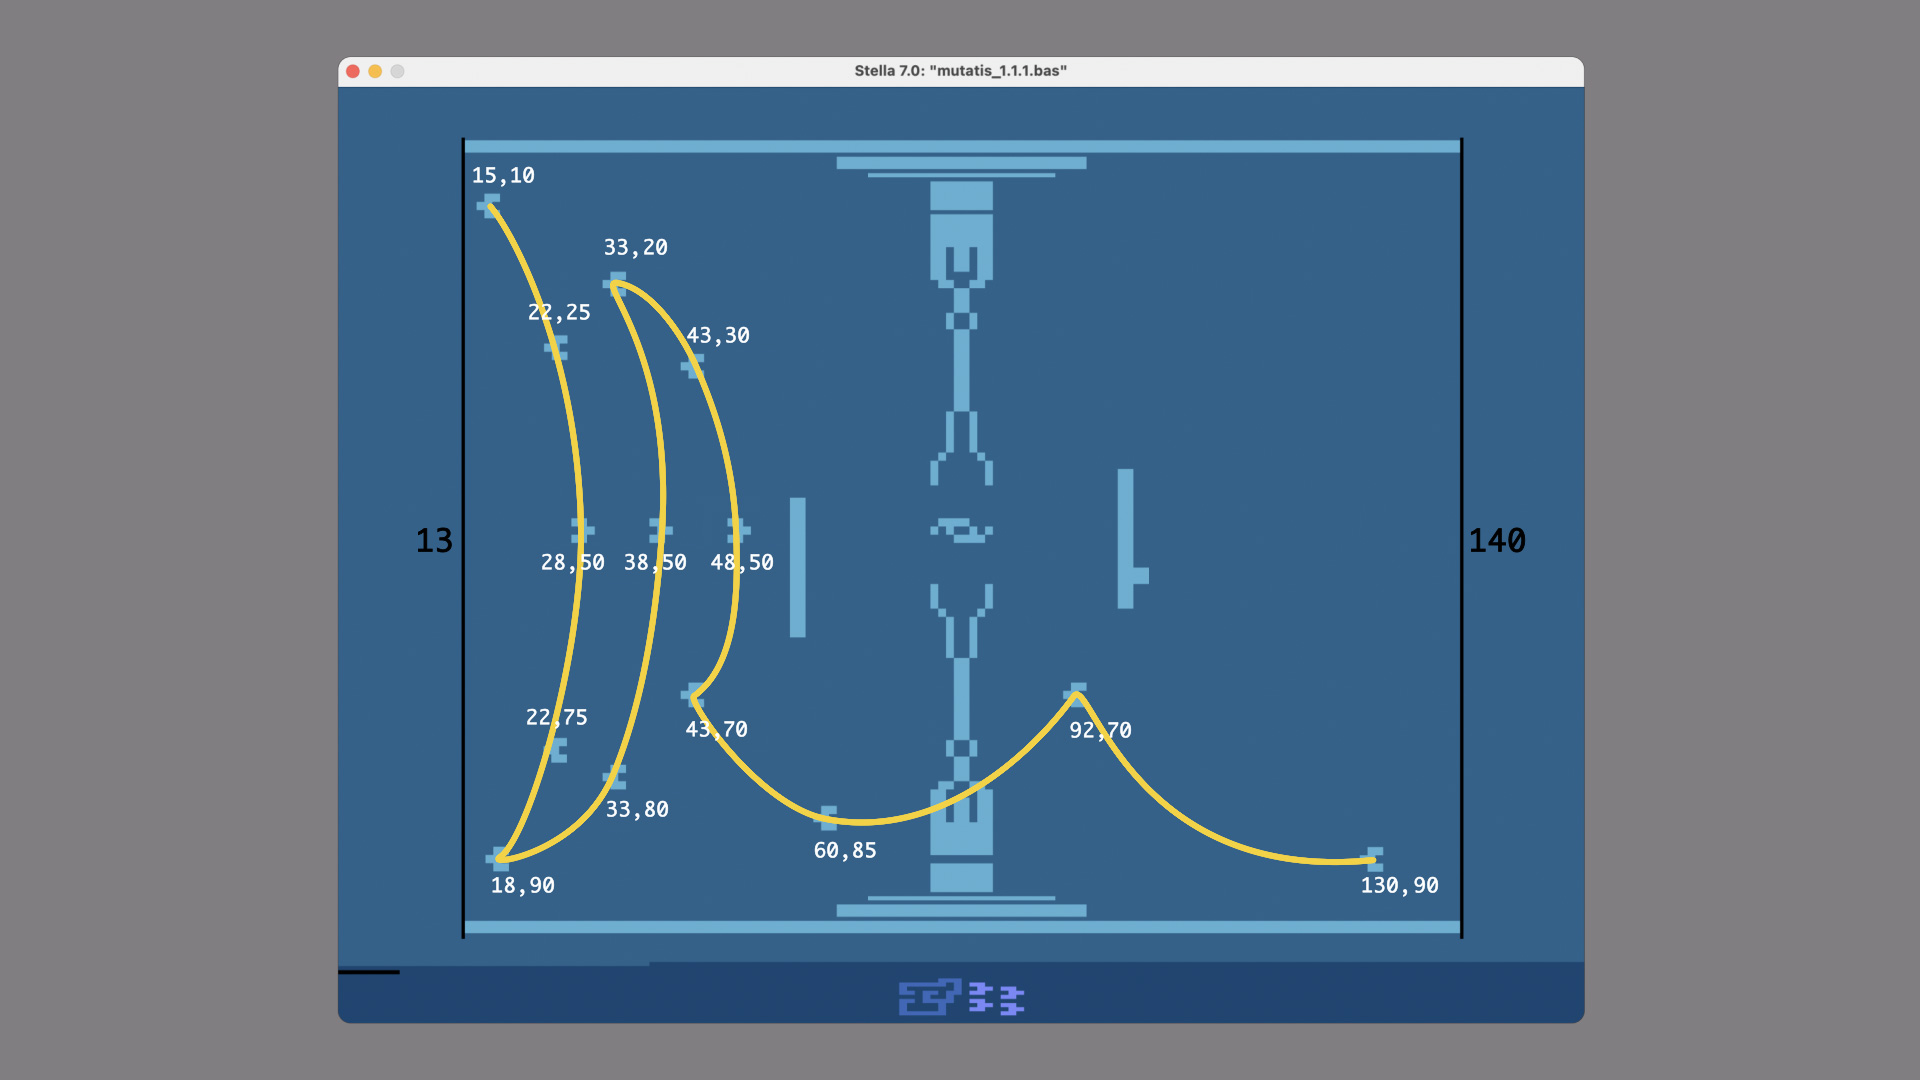
So, issue solved, I went about designing a new flight pattern for the sprite. I placed some coordinates on a graphic and drew a path and then...

...made two arrays, one for the X position and one for the Y position.

This code here introduces random-like pauses which I feel indicates the bug-like behavior that I’m after. Then I did the same thing for the other side.

This bit operator determines which side the Biota Bug appears on, each time it spawns. In fact it determines which side all the enemies appear on. As they fly off screen or are destroyed, this simple code flips the bit operator to determine which side the new enemy will appear on.

For collecting the biota itself, I tried a few swirl patterns, but I found they took too long and just increasing the speed of the sprite wouldn't help because if it happened to overshoot the target coordinate, it would simply get stuck and stop moving.
So at the moment I am using two swirls to collect the biota, which one is activated is dependent on if the Eye touches the Biota Bug on the left or the right. The X and Y values are called from these two arrays. I am temporarily using my damageTimer variable from another routine since I am running out of variables.

Incrementing this value changes the target pair of coordinates, moving the sprite through the path.
I’d like to add two swirls on the bottom, so collecting the biota is particular to each quadrant of the screen.
I also want to smooth out the swirl motion by including more values in the array, so the gaps between target coordinates are so negligible I can drop using math entirely, no longer adding mutantEnemyS to mutantEnemyX and Y, instead moving the sprite directly through the array values.

Now with the Biota Bug sprite implemented, I added some horizontal flips of the sprite every few seconds to add to the bug-like impression. Remember, an 8 value in REFP0 or REFP1 does not mean “left” but rather “flip horizontal axis.”
Grabber New Spawn Issues

Now that I have arrays working, I decided to simplify the litany of if-then statements that I was using throughout the code, like the ones I was using to determine the new Y position of the Grabber when it respawned, based on my timer called microSeconds.
In my first attempt I was thinking, well I have 70 ticks per minute, and from 25 to 95 pixels there are 70 increments, so that’s perfect, I’ll just input seventy values for a wide variety of possible positions.

Well when I typed in all those values it returned a “maximum line length” error, after I compiled, because I didn’t even know data arrays have a maximum line length. Simple fix, though-- just use a carriage return to make multiple lines of the array values.
However, this code resulted in the sprite spawning within a narrow range always at the top. This led to a still-unsolved mystery of various attempts for a more random-looking Y position. Each attempt was a varied technique, nonetheless it resulted in the same narrow distribution. I even thought maybe I was accidentally redefining mutantEnemyY somewhere downstream in the code flow, but that was not the case.

I also tried using random, but received similar results.

For the time being I simplified the spawn array to this code as a temporary pseudo-solution for later experimentation.
******************************

Arena Level Color
I did successfully adapt my arena level color code to an array, however, and it looks much cleaner (and it saved me 149 bytes in Bank 1!).
Then I tried to reduce my enemy speed and velocity statements also to an array, but apparently you can’t use values intended for fixed-point math in the array? Maybe there’s a work-around? Or the syntax is different?
******************************
Racing the Beam
Personally, the most exciting change to the game, I have now officially raced the beam!
What beam?

Kernels control how and what the screen displays. And bAtari BASIC includes a number of optional kernels which you can implement in your game.
Well, when programming in bAtari BASIC, you can access the screen space below the playfield by using a pre-made minikernel, or by writing your own minikernel in Assembly.
bAtari BASIC is a high-level language, as such it utilizes language abstractions, the programmer kinda floats over the minutiae of the hardware. Whereas with the more intensive low-level language Assembly, one dives directly into the concrete.

Since I wanted to create a custom status area below the playfield, and I knew that required Assembly, I searched on the Atari Age forums to find a tutorial (thx Karl G).
Just starting out, but I managed most of the results I was after. The status bar on the bottom of the screen keeps track of both health and the biota collected by the player.
Here’s a brief overview:
******************************

My Minikernel
I wrote the game kernel in bAtari BASIC. And the minikernel in Assembly. Both files are saved in the same location.

At the end of my multi-bank game file, I use an inline command to link to the minikernel. Above that, I have several data blocks defining the sprite shapes, and the colors I want to display them with, as well as the background color for the status bar, which changes per level.

The variables in the bAtari BASIC file, which hold the player’s health and biota count, determine which data from these blocks the Assembly file uses to display the minikernel. And the player0 and player1 sprites are repositioned, and the colors set. A return from subroutine instruction gets us back to the main kernel (the code pictured above is not the whole minikernel, but a selection to give the general idea).
******************************

The Comb
The little horizontal black line on the bottom left of the screen, they call this (colloquially), a comb-- which is easier to understand why they call it that, when it appears in multiples, as you may have seen on classic 2600 games, such as The Empire Strikes Back, Berzerk, Vanguard, and Missile Command.
It occurred to me while working on the graphics in this devLog, the comb lines in Berzerk are one scanline directly above the heads of the robots, and the copyright text.
They appear when player0 and player1 are repositioned horizontally onscreen within the same frame. This is different than moving a sprite in its X value across multiple frames. This is the same sprite repositioned during the same frame. In other words you are giving the appearance of multiple sprites, but they are really the same sprite, player0 or player1 (or missile0, missile1, or the ball).
You might think of it not as discrete objects displayed onscreen, but rather as a beam drawing single scanlines, one at a time, and each of those scanlines may or may not contain data pertaining to the sprites, or the background, or the playfield.

In my case, my game kernel is using the player0 sprite as Mutatis in the center, and the power structures above and below, that’s all one instance of the sprite-- and then again, a second instance, as the health indicator on the bottom left in the minikernel. Likewise, the player1 sprite is used by the kernel as the enemy sprite, and below in the minikernel, as the biota indicator. How?
After drawing a sprite in one location, we then redefine its shape and position before the beam arrives at the new location. And if there isn’t enough time, to both run the code and draw to the screen, running the code takes precedence, leaving a sliver of the screen empty (or is that part of the screen delayed and bumped to the right?).
And so the comb appears. You could say the comb indicates where we lost our race against the beam (I think?). For a much more thorough explanation, and one that’s also more scientifically accurate, here’s a link.
This comb effect is also referred to as HMOVE Lines, as they appear when using the HMOVE register. This forum post on Atari Age has more technical detail, which I am still grappling with.
(Activision is famous for masking out the comb by simply ensuring that area of the screen is black, so the comb is black over a black background. This aesthetic solution effectively reduces the screen resolution by a few pixels.)
******************************
The Future
So that’s more or less everything. Still to code:
• End screen facility escape
• Bonus speed level
• Game select options
• Difficulty select options
• Enemy types: eye catcher (grabs The Eye), poisoner (inverts controls), a type that drops health
• Mutatis mutations
• Playfield variation per level
• Sound
******************************
The current line count is: 2729
The current game size is:
73 bytes of ROM space left in bank 1
428 bytes of ROM space left in bank 2
1300 bytes of ROM space left in bank 3
1354 bytes of ROM space left in bank 4
So I estimate I am now about three-quarters finished with Mutatis (ha). If you want to, feel free to leave any bug reports in the comments.

Thanks for your attention...!
peace,
-william
EDIT: *Very* cool, James and Tanya of ZeroPage Homebrew play this build of Mutatis here.
Leave a comment
Log in with itch.io to leave a comment.